Let's get started!
I like to start with my foundation, any concealer I need, and priming my eyelids. I really tried to make my skin as perfect as possible, and powdered over my concealer to set it on my skin.
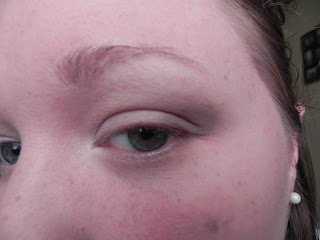
I wanted to go ahead and map out the basics of the look and prime my eyes for the colors I am going to apply. I used a NYX jumbo eyeshadow pencil in Milk on the inner corner of my eye and below my brow bone. Then I used the Maybelline color tattoo in Tough as Taupe on the outer corner of my eye and half way into my crease.
I used Ricepaper from MAC all over my eyelid. The inner area of the eyelid will stay light throughout the look and I just wanted to go ahead and start the foundation for that.
Next I used Free Love from Urban Decay. In many of the looks I saw on Adele there was a coral undertone it seemed, so I lightly ran this color through my crease to try and give that effect.
To darken up the crease and outer eye area I used Sable by MAC. This is a beautiful plum, taupe, brown color, that is the closest color I have to what it looks like Adele is often wearing. I really concentrated the color in the crease and used it to darken up the outer "v" area. I went back with Ricepaper in areas I felt were too dark to keep the majority of the lid light. I also used the same brush to run a little bit of Sable underneath my eye along the lower lash line.
To finish up with the shadow I used Virgin from my Naked Palette in the inner corner of my eye and on my brow bone.
I feel like the most important part of any Adele look is the winged eyeliner. Here is the initial steps of that process. I am using a gel liner and a liner brush. I like to start in the center of my lid and bring the line straight out. Then working from the edge of my lashes I continue the line of my lower lashes out until the two lines meet.
The next part of the process is to fill in the open area that was created by bringing the two lines together. Also bring the liner into the the inner part of your eye trying to keep the line as thin as possible.
Once you have the basic shape of your wing keep making the wing thicker until you have it where you would like it to be. I did a very dramatic wing, because I feel like that is a staple to Adele's look. A big tip to this process is to take you time and steady your elbow on a firm surface. Also keep a Q-Tip handy. Use the Q-Tip with a small amount of eye make-up remover to help get the line crisp.
To finish up the eyes I added mascara and false lashes! Remember to curl the false lashes after they have dried, so that they combine better with your natural lashes.
(These are eyelashes I just happened to have laying around. I would recommend lashes that flare out more on the ends, giving a cat eye effect, rather than being full in the center. The cat eye lashes will better accentuate the wing and be more similar to what Adele would wear. In fact I think she is wearing a half set of lashes in most pictures.)
Another essential part of the Adele look is heavy conturing. In many cases she is not wearing anything on the cheeks but contour. I used my NARS Laguna bronzer in the hollows of my cheeks, along my temple, and under my chin. I did this much darker than I normally would. After the last picture, I used my foundation brush, that still had a little foundation from earlier on it, and blended out this super harsh line. I tried to just blend and not remove too much of the actual contour.
I used a powder highlighter along the tops of my cheek bones and down my nose. I also put some on my cupids bow an below my lower lip to make my lips look a bit fuller.
I felt like the contour looked pretty harsh on my face, so I used a dusty rose colored blush on the backs of my cheekbones to add a little bit of color. I was careful not to bring it too far forward, because in the picture I was using she was not wearing any blush.
I finished off the look with Revlon Just Bitten Kissable Balm Stain in Honey. Here is the before and after:
To finish out this look I would wear a black figure flattering dress, add some volume and curls to my hair, and add some really great statement earrings. The look could also be slightly modified for just a great going out look!
I hope you all really liked this and will give it a try. I have at least two other ideas for Halloween looks coming up. Let me know in the comments if you have any requests! -Jessica


No comments:
Post a Comment